
Bulk Form Request Generation allows administrators and developers to create Form Requests for multiple Salesforce records in a single execution. Instead of opening each individual record to generate a Form Request, you can automate the process using Flow Builder, an Invocable Apex Action, custom Apex code, or a Custom List View Button.
This feature is ideal for processing large numbers of records efficiently while following Salesforce bulkification best practices.
Example Use Case #
Generate Mass Form Requests for a collection of records (e.g., Accounts with AccountSource
= ‘Web’) in a single execution using Flow Builder, Invocable Apex Action, or custom Apex code.
Example:
Instead of manually navigating to each target record to trigger document generation, an Admin
or Developer can launch an automated process (Flow, Batch, or Apex execution) that
automatically collects record IDs and passes them to the Mass Request Engine alongside a
designated Doc Config ID
1. Apex Invocable Service #
Create an Apex class that exposes an @InvocableMethod for Flow Builder while encapsulating
the core bulkification logic.
public with sharing class MassRequestService {
public class FlowInput {
@InvocableVariable(label='Doc Config ID' required=true)
public Id docConfigId;
@InvocableVariable(label='Record IDs' required=true)
public List<Id> recordIds;
}
@InvocableMethod(
label='Create Mass Form Requests'
description='Generates Form Requests in bulk for a list of Record IDs using a specified Doc Config'
category='Form Butler'
)
public static void executeMassRequest(List<FlowInput> inputs) {
if (inputs == null || inputs.isEmpty()) {
return;
}
FlowRequest input = inputs[0];
if (input.docConfigId != null && input.recordIds != null && !input.recordIds.isEmpty()) {
Actionable_FormButlerWeb.createFormButlerRequests(input.docConfigId, input.recordIds);
}
}
}
2. Flow Setup (Autolaunched / Scheduled) #
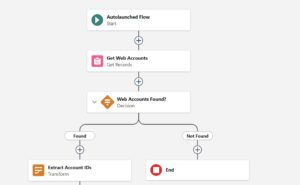
Follow these steps to build an automated Flow to query records and invoke the Apex Action.
Step 1: Query Records (Get Records)
● Element: Get Records
● Label: Get Web Accounts
● Object: Account
● Filter Conditions: AccountSource Equals ‘Web’
● How Many Records to Store: All records
Step 2: Validate Records (Decision)
● Element: Decision
● Label: Has Records?
● Outcome Label: Yes
○ Condition: {!Get_Web_Accounts} Is Null {!$GlobalConstant.False}
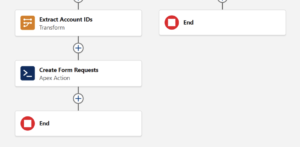
Step 3: Extract Record IDs (Transform)
● Element: Transform
● Label: Extract Account IDs
● Target Data Type: Text (Check “Allow multiple values (collection)”)
● Mapping: Connect Get_Web_Accounts ➔ Id to the Target Collection.
Step 4: Invoke Apex Action (Action)
● Element: Action
● Label: Create Form Requests
● Action: Create Mass Form Requests
● Set Input Values:
○ Doc Config ID: Set target Doc_Config__c Record ID.
○ Record IDs: Pass output collection from {!Extract_Account_IDs}.
3. Testing & Verification #
1. Flow Execution: Run or schedule the Flow.
2. Result Check: Navigate to the Form Request object tab or target Debug Logs to verify
that request records have been inserted in bulk for each queried Account ID.
4. Apex Service / Example Code (Production-Ready) #
Apex:
public with sharing class MassRequestService {
/**
* @description Generates Form Requests for Web Accounts using a target Doc Config
* @param docConfigId Target Doc Config Record ID
*/
public static void processWebAccounts(Id docConfigId) {
if (docConfigId == null) {
throw new IllegalException('Doc Config ID cannot be null.');
}
// 1. Query Account IDs with FLS enforcement
List<Account> webAccounts = [ SELECT Id FROM Account WHERE AccountSource = 'Web'
WITH USER_MODE LIMIT 10
];
if (webAccounts.isEmpty()) {
return;
}
// 2. Extract IDs
List<Id> accountIds = new List<Id>(new Map<Id, Account>(webAccounts).keySet());
// 3. Execute Bulk Generation
try {
cadmus_form__Actionable_FormButlerWeb.createFormButlerRequests(docConfigId, accountIds);
} catch (Exception e) {
// Log or handle exception as needed
throw new HandledException('Failed to process Mass Form Requests: ' + e.getMessage());
}
}
}
Usage:
// Example: Processing Mass Form Requests via Apex
Id docConfigId = ‘a01XX00000XXXXX’; // Replace with actual Doc Config ID
// Execute mass generation
MassRequestService.processWebAccounts(docConfigId);
Bulk Form Requests Creation via Custom List View Button (LWC & Visualforce) #
Step 1: Create Lightning Application Bundle (Lightning Out Container) #
To surface a Lightning Web Component (LWC) on a Visualforce page (e.g., inside a Classic or Console List View Button), you need an Aura Application that acts as a Lightning Out container.
1. Create the Aura Application Component
● Developer Name: FormRequestListActionApp
● File: FormRequestListActionApp.app
<aura:application access=”GLOBAL” extends=”ltng:outApp”>
<aura:dependency resource=”markup://cadmus_form:formB_MultipleFormRequests” />
</aura:application>
2. Create the Bundle Metadata
● File: FormRequestListActionApp.app-meta.xml
<?xml version=”1.0″ encoding=”UTF-8″?>
<AuraDefinitionBundle xmlns=”http://soap.sforce.com/2006/04/metadata”>
<apiVersion>66.0</apiVersion>
<description>Lightning Out container application for Form Butler List View Action</description>
</AuraDefinitionBundle>
Implementation Notes:
● extends=”ltng:outApp”: Enables Lightning Out functionality.
● access=”GLOBAL”: Required for external bridge accessibility.
● <aura:dependency>: Pre-loads the target LWC
(cadmus_form:formB_MultipleFormRequests) into the dependency tree
Step 2: Create Visualforce Page for Account List View Action #
To bridge the standard List View selection ({!selected}) with the Managed Package LWC, create a Visualforce page bound to the Account standard controller.
Visualforce Page (FormRequestAccountListAction.page)
<apex:page standardController="Account" recordSetVar="records" lightningStylesheets="true"
docType="html-5.0">
<apex:includeLightning />
<div id="lightningOutContainer">
<div class="slds-spinner_container" id="loadingSpinner">
<div role="status" class="slds-spinner slds-spinner_medium">
<span class="slds-assistive-text">Loading...</span>
<div class="slds-spinner__dot-a"></div>
<div class="slds-spinner__dot-b"></div>
</div>
</div>
</div>
<script type="text/javascript">
(function () {
const selectedIds = [
<apex:repeat value="{!selected}" var="rec">
'{!rec.Id}',
</apex:repeat>
].filter(Boolean);
const objectApiName = "{!$ObjectType.Account.Name}";
const lwcAttributes = {
recordIds: selectedIds,
sObjectApiName: objectApiName
};
$Lightning.use("cadmus_form:FormB_CreateMultipleFormRequests", function () {
$Lightning.createComponent(
"cadmus_form:formB_MultipleFormRequests",
lwcAttributes,
"lightningOutContainer",
function (cmp, status, errorMessage) {
if (status === "SUCCESS") {
const spinner = document.getElementById("loadingSpinner");
if (spinner) {
spinner.style.display = "none";
}
} else {
console.error(errorMessage);
}
}
);
});
})();
</script>
</apex:page>
Step 3: Create Custom List Button #
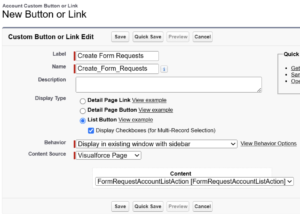
1. Go to Setup > Object Manager and select your target object (e.g., Account).
2. Click Buttons, Links, and Actions and click New Button or Link.
3. Configure the button settings:
○ Label: Create Form Requests (or preferred name)
○ Name: Create_Form_Requests
○ Display Type: List Button
○ Checkbox: Enable Display Checkboxes (for multi-record selection)
○ Content Source: Visualforce Page
○ Content: Select FormRequestAccountListAction
4. Click Save.
Step 4: Add Button to List View Layout #
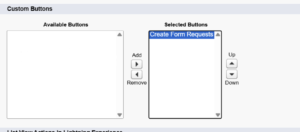
1. In Object Manager, select List View Button Layout for your target object.
2. Click Edit next to List View Layout.
3. Under Custom Buttons, move Create Form Requests to the Selected Buttons list.
4. Click Save.
Step 5: Verification & Testing #
1. Navigate to your target object tab (e.g., Accounts).
2. Open any List View, select one or more records using checkboxes, and click the new list
button.
3. Verify that Form Requests are generated for all selected records.


