Emails for SIGN Butler V2 are send through Salesforce.
So it is important that all emails come from a person that your signer knows!
In this article, we explain the options and indicate it is best to use and OWA (Org Wide Address) or the “User Admin” functionality.
All emails in Sign Butler are sent through Salesforce, which means email delivery is subject to Salesforce limitations and security rules.
One important concept to understand is that sending sign request emails is a multi-step process:
- A user launches the sign request from Salesforce.
- Signers interact with the signing page.
- Additional automated emails may be triggered afterward:
- Next signer notifications
- Download emails
- Reject notifications
- Revoke notifications
The challenge is that automated emails triggered after signing are no longer sent directly in the context of the original Salesforce user. Because of this, Salesforce applies strict controls on which user or email address can be used as the sender.
This article explains all available options for controlling the From Address in Sign Butler emails.
Initial Sign Request Email #
When a user clicks the button to send a sign request, the email is sent directly from Salesforce in the context of the logged-in user.
This is straightforward because Salesforce knows exactly which user initiated the action.
Automated Follow-Up Emails #
After a signer interacts with the signing page, Sign Butler may need to send additional emails automatically.
Examples include:
- Next signer notifications
- Signed document download emails
- Reject notifications
- Revoke notifications
At this stage, Salesforce no longer operates in the context of the original user session. Because of that, Salesforce restricts how sender addresses can be controlled.
Available Email Sender Options #
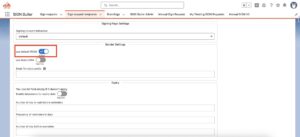
Option 1 — Use the Default From Address #
The first option is to use the Default From configuration.
With this setting enabled:
- The email sender becomes the current Salesforce user.
- The sender is the user who launched the sign request.
Important Consideration #
For automated processes, this may not always be desirable because the sender could become:
- A system administrator
- An integration user
- An automated process user
In many organizations, this is not the preferred sender identity.
Option 2 — Use a Static Organization-Wide Email Address #
Another option is to use a static email address through a Salesforce Organization-Wide Address (OWA).
Examples:
- no-reply@company.com
- sales@company.com
- sign@company.com
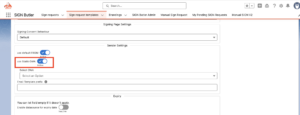
Benefits #
This approach is simple and easy to maintain because:
- All emails come from the same address
- All replies can go to a shared inbox
- No dependency on individual Salesforce users
Example #
If you configure:
info@yourcompany.com
Then:
- All Sign Butler emails are sent from that address
- All replies go back to the same inbox
Option 3 — Use a Dynamic User via Data Source #
You can disable both:
- Static Organization-Wide Address
- Default From
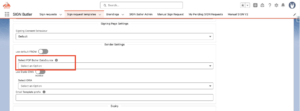
When both are disabled, a configuration field appears that allows you to define a Data Source.
The data source must return a Salesforce User.
Common Example #
Using the Opportunity Owner as the sender.
This allows emails to appear as if they were sent directly from the responsible salesperson.
Important Salesforce Limitation #
Salesforce does not allow users to send emails on behalf of another user unless specific permissions are configured.
Because of this limitation:
- Every user used as a sender must have an Organization-Wide Address configured.
Example Scenario #
Suppose:
- Your sales team has 10 users.
- An SDR launches sign requests.
- You want emails to appear from the Opportunity Owner instead.
In this scenario:
- Every salesperson requires their own Organization-Wide Address.
Example:
- salesperson1@company.com
- salesperson2@company.com
- salesperson3@company.com
Drawback #
This approach becomes difficult to maintain as the team grows.
Automated Email Behavior #
The same sender logic also applies to automated emails triggered after signing events.
Examples include:
- Next signer notifications
- Download emails
- Reject emails
- Revoke emails
Static Address for Automated Emails #
The easiest setup is again using a static Organization-Wide Address.
Example:
sales@yourcompany.com
Advantages:
- Simple configuration
- Predictable sender behavior
- Minimal administration
Dynamic Sender for Automated Emails #
You may also use a Data Source to dynamically select a sender for automated emails.
Example:
- Opportunity Owner
However, this again requires every possible sender to have an Organization-Wide Address configured.
Using the User Admin Authorization Method #
If you do not want to maintain multiple Organization-Wide Addresses, Sign Butler provides another solution: the User Admin authorization process.
How It Works #
Each salesperson only needs to:
- Open the User Admin tab
- Click the Send Request button once
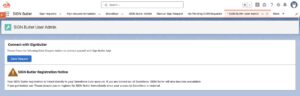
The process takes only a few seconds.
Benefits of User Admin Authorization #
Once authorized:
- Sign Butler can continue sending automated emails in the context of the original initiating user.
- No separate Organization-Wide Address is required for every salesperson.
This means:
- The user who launched the sign request remains the sender for all follow-up emails.
- Setup becomes significantly easier to maintain.
By understanding these options, administrators can fully control how Sign Butler emails are sent and presented to recipients.