Package: Contract Butler
Version: 1.14
Last Updated: 02 Mar 2026
1. Overview #
This document describes how to configure Auto Approval using Salesforce Flows for the Contract Butler.
Auto Approval allows automatic submission and approval of records based on predefined business rules without manual user interaction.
2. Step 1 – Enable Custom Approval in Package Settings #
- Open Setup in Salesforce.
- In the Quick Find box, enter Custom Settings.
- Select Custom Settings from the results.
- Locate Contract Setting General in the list.
- Click Manage next to Contract Setting General.
- Click Edit.
- Enable the checkbox ☑ Use Custom Approval?.
- Click Save.
3. Step 2 – Create Flows #
3.1. Create Flow: Contract Save New Version #
- Open Setup.
- Navigate to Flows.
- Click New Flow.
- Select Screen Flow
Contract Save New Version is a screen flow designed for custom save new contract version:
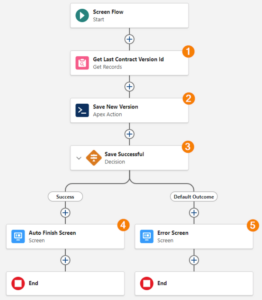
Flow: Agreement Submit
The Flow performs the following steps:
-
Retrieves the latest Contract Version related to the current Contract.
-
Executes the Contract Lifecycle Apex Action with actions
SAVE_NEW_VERSIONandACTIVATE. -
Evaluates the result of the operation.
-
If successful, the Flow automatically finishes using the Contract Flow Auto Finish LWC component.
-
If an error occurs, the Flow displays an error screen with the returned message
3.1.1. Get Records – Get Last Contract Version Id #
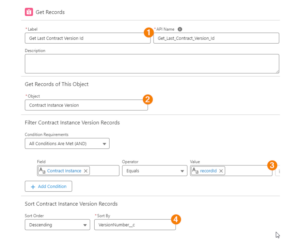
Label: Get Last Contract Version Id
Purpose: Retrieve the latest Contract Version related to the Contract.
-
Object: Contract Version
-
Filter:
-
Contract Instance =
{!$Record.Id}
-
-
Sort Order: Descending – VersionNumber__c
-
Store: Only the first record
-
Store field: Id
3.1.2. Apex Action – Contract Lifecycle Action #
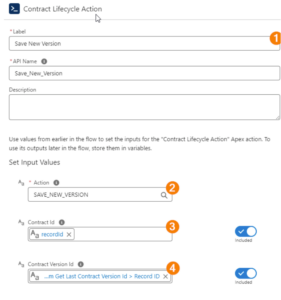
Label: Contract Lifecycle Action
Type: Apex Action
Parameters:
-
Actions →
SAVE_NEW_VERSION -
Contract Id →
{!$Record.Id} -
Contract Version Id →
{!Get_Last_Contract_Version.Id}
Purpose:
Creates a new version and approve clauses.
Output:
-
Applied Action (Text)
-
Contract Id (Text)
-
Message (Text)
-
New Version Id (Text)
-
Source Version Id (Text)
-
Success(Boolean)
3.1.3. Decision – Save Successful #
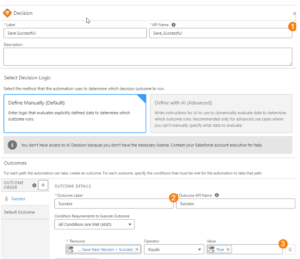
Label: Save Successful
Outcome: Save New Version
Condition:
-
Success Equals True
Default Outcome:
- Error
Purpose:
- Branch flow depending on Apex execution result.
3.1.4. Screen – Auto Finish Screen #
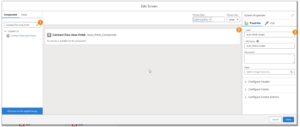
Label: Auto Finish Screen
Component:
- Search in Components: Contract Flow Auto Finish
- Drag and drop component onto the Screen.
Configure:
-
Enter Label
-
Enter API Name
Purpose:
Automatically closes the Flow after successful execution.
3.1.5. Screen – Error Screen #
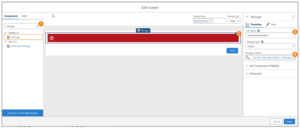 Label: Error Screen
Component: Message
Message Content: {!Message} (Output from Apex Action)
Purpose:
Display error details when Save New Version fails.
3.2. Create Flow: Contract Activate #
The Contract Activate Flow is created in the same manner as the Save New Version Flow.
Key Difference
This Flow executes the Contract Lifecycle Apex Action with a parameter:
- Action: ACTIVATE
Flow Behavior
The Flow:
- Retrieves the latest Contract Version.
- Executes the Contract Lifecycle Apex Action with:
– Action: ACTIVATE
– Contract Id
– Contract Version Id - Evaluates the execution result.
- Displays:
– Auto Finish Screen if successful.
– Error Screen if activation fails.
This Flow is used to activate an existing Contract Version without creating a new version.
4. Step 3 – Adding Actions to a Record Page #
4.1 Create Save New Version and Activate Quick actions #
 #
#
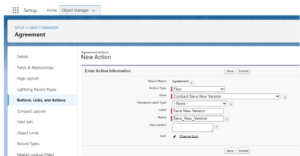
-
Open the Agreement object in Object Manager.
-
Go to Buttons, Links, and Actions and click New Action.
-
For Action Type, select Flow.
-
In Flow, choose the target flow (e.g., Contract Save New Version, Contract Activate).
-
Enter the Label and Name.
-
Click Save.
4.2 Add Highlight Panel with Save New Version and Activate actions #
Open the Record Page in the Lightning App Builder
-
Find the Highlights Panel standard component.
-
Drag and drop the Highlights Panel component into the Header section of the page.
-
Click Add Action.
-
Search for the Quick Action by name (e.g., Save New Version or Activate).
-
Select the action and click Done.
-
Click Save to save the page.


