Prerequisites: PDF Butler, Form Butler packages installed in Salesforce org. After the package setup Salesforce Admins must setup Web Form Configuration records in Salesforce.
Salesforce Configuration for using Web Forms. #
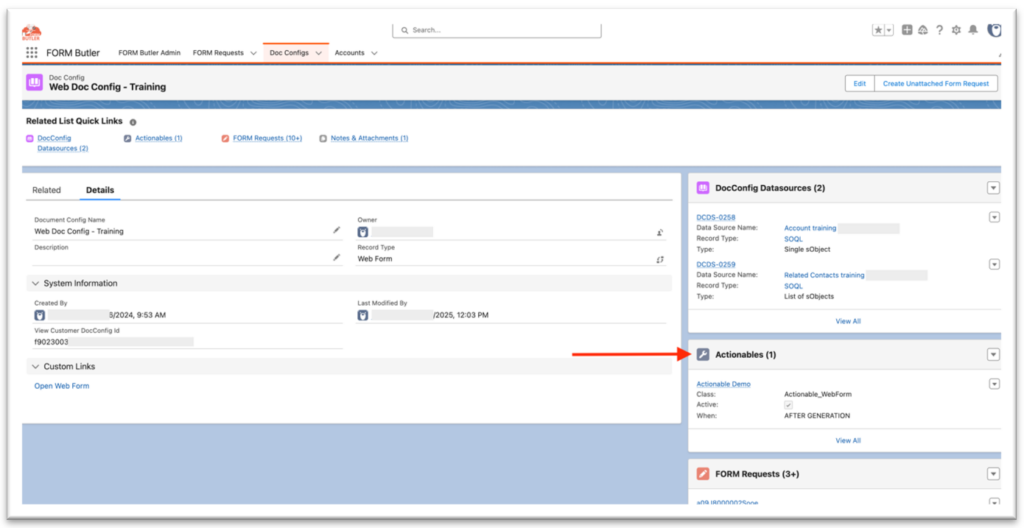
- Create a Doc Config. Doc Config – is a custom Object that enables Web Form builder for Admins to construct dynamic web forms.
- Navigate to Salesforce Apps, open PDF Butler App -> Doc Configs Tab.
- From the Doc Config Tab click New button to create a new Doc Config record:
- Record Type: Web Form
- Name: Account (or your Object name).
- Next step, is to add Datasource in order to assocciate the Web Forms with Salesforce records like: Account, Contact, or your any Custom object.
- Create a Datasource for Account object as an example (you can pick any other object type in Salesforce).

-
- From the Doc Config related list → New → + New Data Source.
- Then populate these fields:
- Record Type: SOQL
- Name: Account training;
- Type: Single sObject;
- SOQL Builder Managed: true (to enable SOQL builder)
- Click Save.
- From the Doc Config related list open the Data Source, then click SOQL. Builder button on the right top to open SOQL builder page:
- Select Object tab: Select Account,
- Select Fields tab: Account ID, Account Name, Account Phone, Annual Revenue, SLA.
- Add Filters tab:
- Select field: Account Id
- Operator: =
- Select Type: Use recordId
- Click Save Query button.
- Create Actionable record.
-
- Go to the Doc Config page -> related list and click New.
- Select Record Type – FORM Butler.
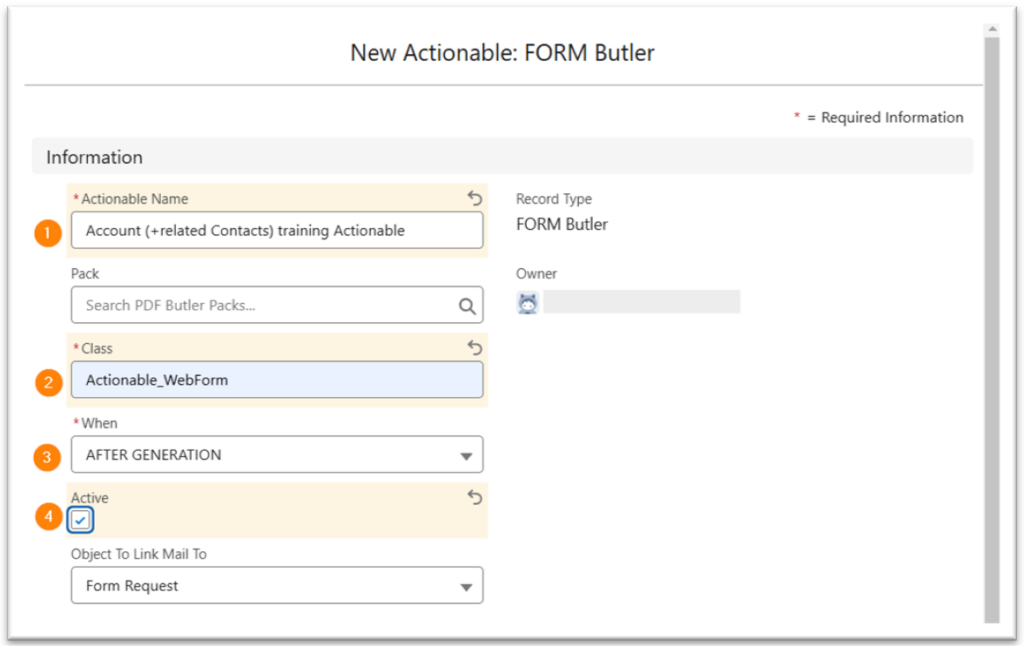
- (1) Actionable Name: Name of actionable record.
- (2) Apex Class: class API name, which executes after the creation of Form Request. In this class, additional automatic processes such as automatic email sending can be implemented.
- (3) When: AFTER GENERATION by default.
- (4) Active: only by active Actionable Form Request can be created.
- In the Email Info section populate the information about email receivers, if the logic for automate sending emailc added to class from Information section. More information about email receivers on PDF Butler Academy.
In the FORM Butler section populate the next fields:
- (1) Document Action: Select Document Action (Regenerate in this case) the value of this field will be entered in the corresponding field of the Form request.
- (2) Form Doc Config: Select the Doc Config to wich creates Actionable (Account (+related Contacts) training in this case).
- (3) Email Doc Config: Select Doc Config with email template settings. More about Email Doc Config on PDF Butler Academy.
- (4) Email Template Unique Name: instead of Email Doc Config. More about Email Template Unique Name on PDF Butler Academy.
- (5) Field API Name: Lookup field on the FORM Butler Request Object that has the reference to the initiating record (Account__c in this case) the value of this field will be entered in the corresponding field of the Form request.

II. Web Form Builder. #
The Form Builder can be used by Admins to create dynamic we form with the multiple form components.
- Go the Doc Config record -> Custom Links section and click Open Web Form link to open the Builder.
- Below you can see a sample of the Form Builder page with a simple set of fields (dynamic components):
Components section (on the left). Set of components Admins can build a form with. For example, note the Basic Input section you can drag & drop simple input field types on the builder page: Number, Text Fields, etc.:
- (1) Components block. Drug & Drop components for contracting a Web Form.
- (2) From Builder page with the dynamic components.
- (3) Component Properties block – to configure the Form Fields.
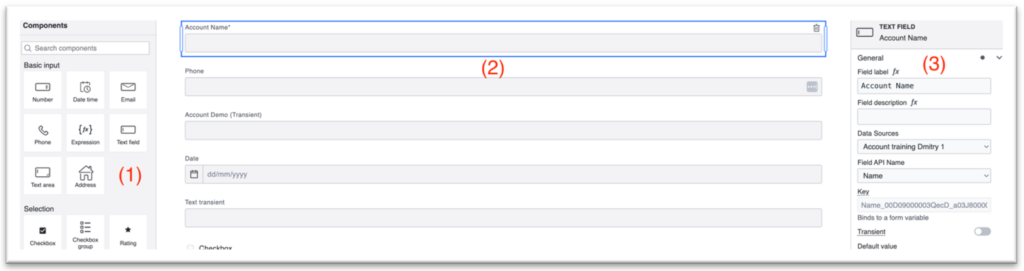
- Dynamic Field configuration. When you click on a dynamic Field on the Builder page (2), for example “Account Name”, the properties panel (3) displays the form field properties Admins can set for the component. Let’s check some of the properties:
- Field Label – a field title shown on the form, in this case – Account Name.
- Data Sources (picklist) – Salesforce Object associated with the Form Field. Remember that for the web form Doc Config (see above) we configured Data Sources (point 2) to associate the Form Fields with Salesforce Object Fields. So, when selecting a Data Source, we get a set of fields form the Data source SOQL shown in the Field Api Name dropdown.
- Field Api Name – Salesforce Object Field associated with the Form Field. In this case we associate Account Name web form component (input) with Salesforce Account.Name which has a matching TEXT type. In this way, when we submit this Web Form, Account Name value can be saved into Salesforce Account.Name.
- Transient Fields (toggle) – a field can be marked as Transient if we don’t want to map the form field value to a Salesforce field. Thus, when submitting the form, the Transient fields will not be saved to Salesforce records but can be present on PDF Document generated for a record.
- Saving Web Form. After you completed work the form with all the dynamic components and settings, it’s time to save your changes – click Save button on the bottom of the builder. This structure will be saved into schema file in the Doc Config -> Attachments. This file will be used for generating Web Form link from Form Request record.
III. Form Request & External Web Form Page. #
As a next steps, admins need to create a Form Request record to generate a Web Form link from the Doc Config. There are few types of the Form Request (FR):
- Check the PDF Butler Academy quick tutorial to follow the steps below: FORM Butler – Initial Web Form.
- Unattached or generic FR – create requests with Never Expired Document Action field value that allows to use link for insert records as many times as needed. From the Doc Config page click “Create Unattached Form Request” button

- Attached to Record FR – used to generate a Web Form that can update records in Salesforce. To create a record related FR, Salesforce Admins should add the “Choose Document Configuration” lightning component (part of the Form Butler package) to a corresponding record page layout. See this documentation, that explains how to add components to the page.
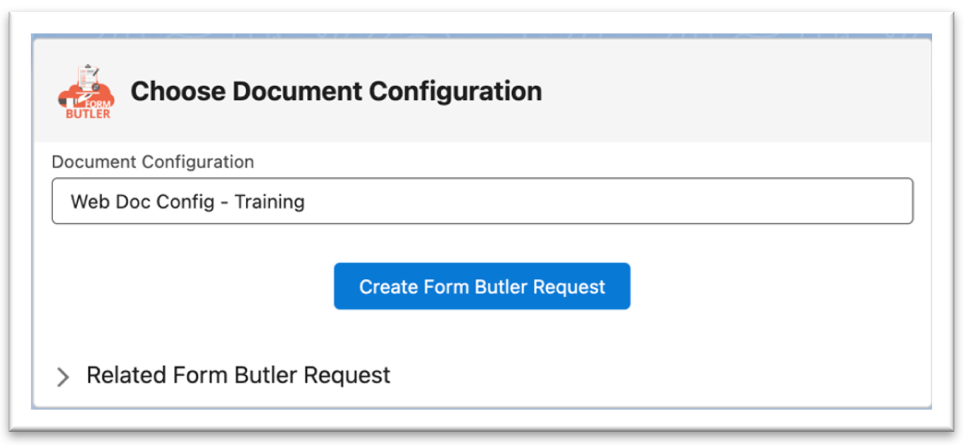
In our example, we locate this component on the Account Record Page in Salesforce. Then Admins can select a Doc Config and click “Create Form Butler Request” button to generate a Form Request.
1. Form Request (FR) #
After the FR record generated, we can point some of the important fields on the page layout Details tab:
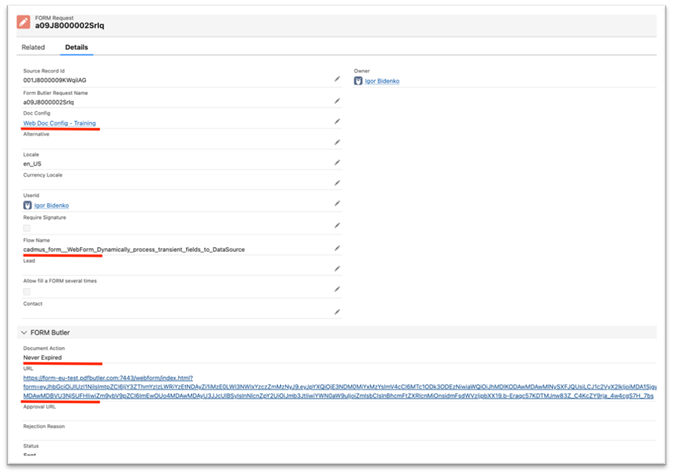
- Doc Config (lookup) – related Doc Config that has been used to generate the FR.
- Flow Name (text) – salesforce Flow, – process that will handle update logic on records in Salesforce after submitting the Web Form. We will cover this part more in details below. Note, this field should be configured on the Actionable (see above, I point 3, Create Actionable), so the Flow Name will be copied from the Actionable when generating a FR.
- Document Action (picklist) – indicates if the FR request can be executed multiple times, so Web Form can be resubmitted or expired.
- URL – Web Form link. This link will open the actual Web Form that can be placed on a 3d party web site or an App, so users (outside of Salesforce) can fill in and submit the form.

2. Form Request Flow with the Transient Fields #
As mentioned above the Actionable Flow can be configured to handle Web For logic in Salesforce. Salesforce Admins can build the Flows in order to extend the Form Butler functionality to have full control over the Web Form data after users submit the web page.
- Check the PDF Butler Academy quick tutorial to see how to setup the flow: Lighting Flow in Salesforce.
This Autolaunched Flow sample can be built to handle fields for update as well as the transient fields from the Web Form above:
- Set DS Assignment – need to create 2 separate Data Sources for the Transient and Non Transient fields.
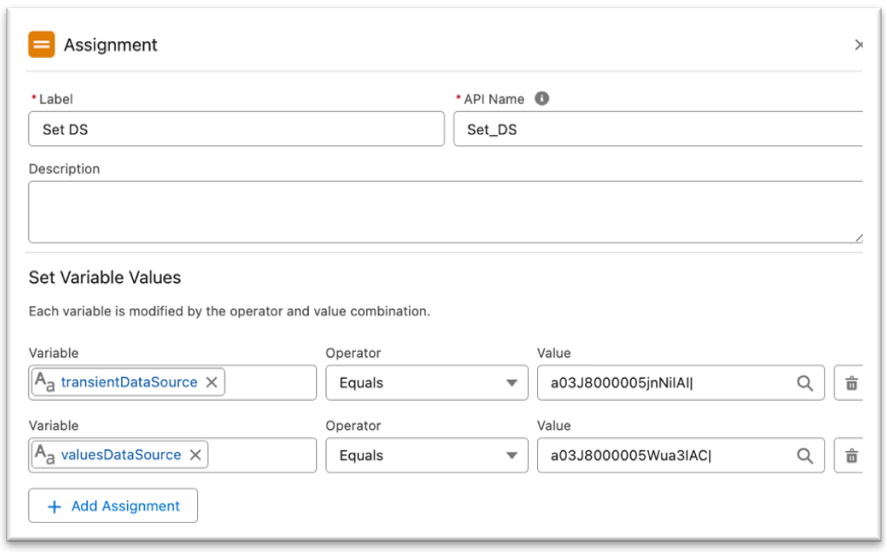
- The valuesDataSource flow variable will store the Data Source Id we created before (see, paragraph I step 2 – create Data Source of SOQL type).
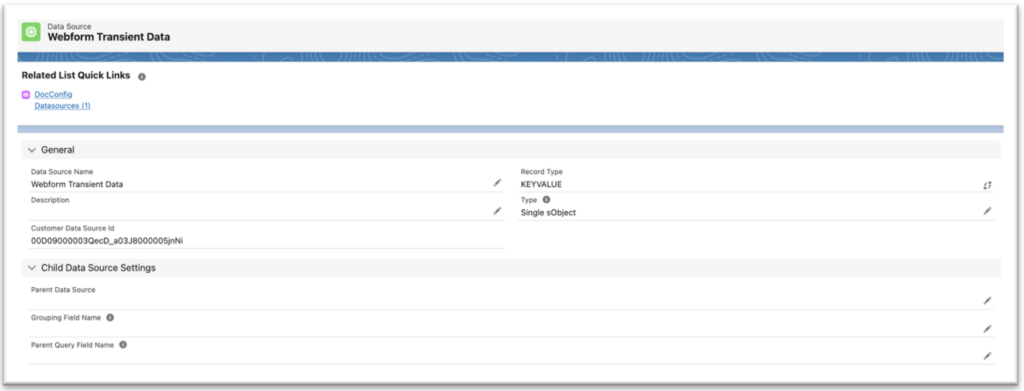
- For the transientDataSource – we need to setup a one more Data Source following steps for the same Doc Config with Record Type = KEYVALUE:
- Web Form data collections. After the web form submission, the form data fields will be split on 2 parts (2 collections) that will be available as collection variables in the Flow:
- transientFields – form fields which will not be saved into Salesforce but used in a PDF Document.
- updatableFields – form fields that will be mapped to SF records, in this example – Account fields.
In flow we need to loop both collections with an assignment – to assign the fields to the Datasources:
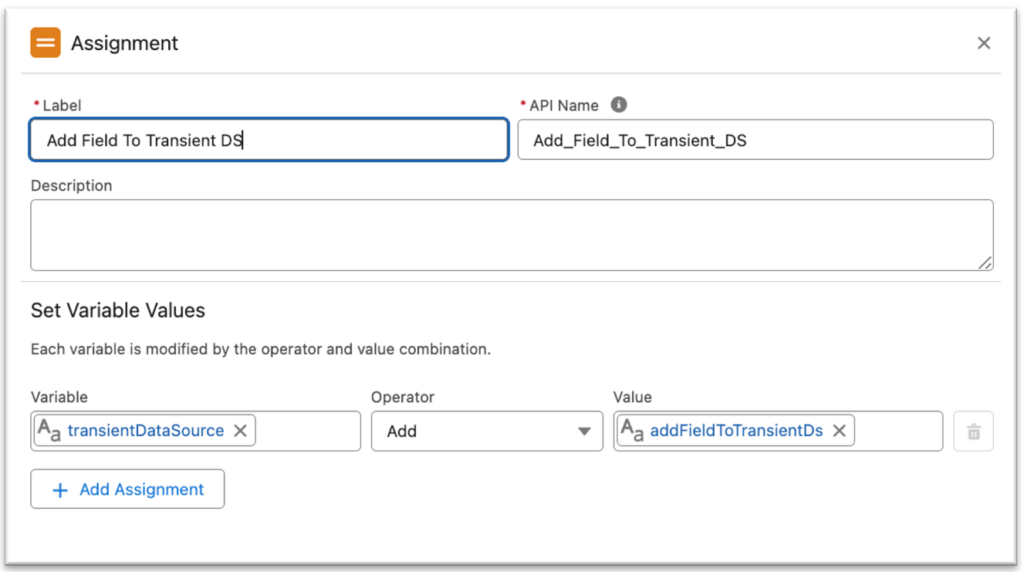
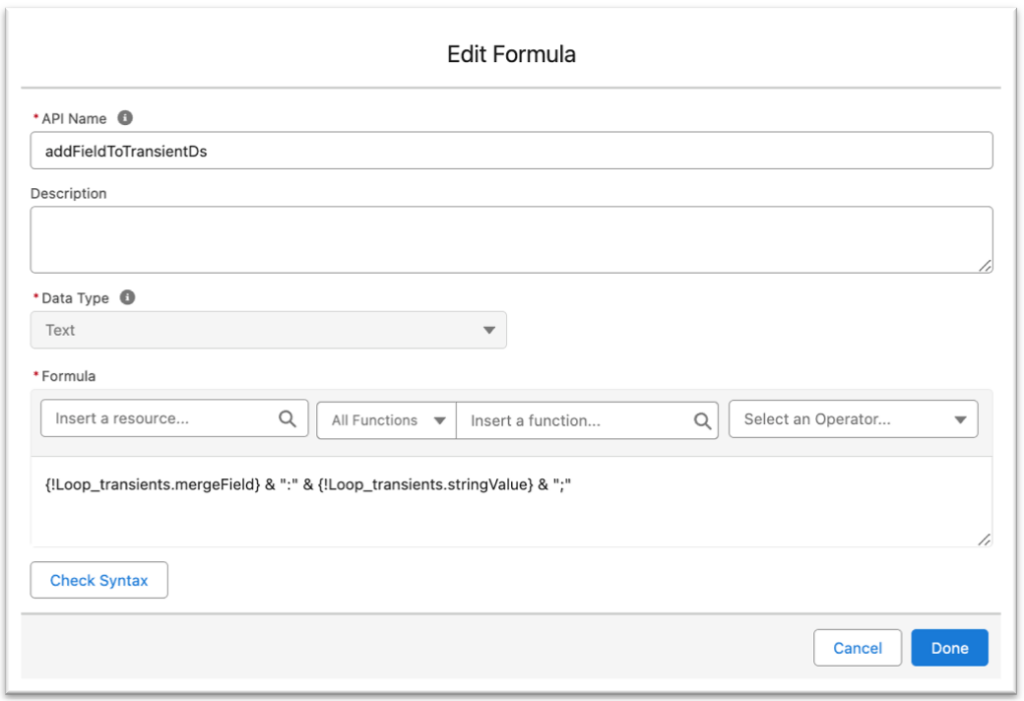
Here addFieldstoTransientDs is a Formula that does simple concatenation:
- Eventually you’ll need to pass this formatted data to the PDF Butler API with the Apex Action to generate a PDF document that can be attached to the Doc Config related record:
- Other Flow actions can be added to handle Salesforce records update for the values updatableFields collection.
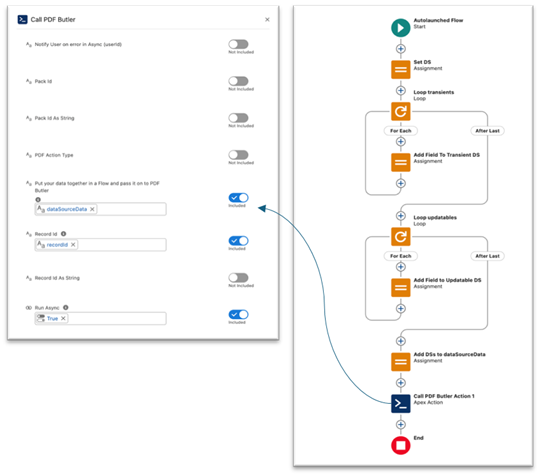
- The data will be handled by the Form Butler for both: transient and updatable fields and attached to the Account (or another object in Salesforce defined in the Doc Config):


