Get an Out-Of-The-Box Sales Cloud setup, this is a full configuration working on Opportunity.
This is a great way to prepare demo’s to customers, prospects, management, …
Learn how to get a demo setup in minutes here.
PDF Butler – Sales Cloud Demo #
1. Access the Demo Environment #
- Go to: https://assets.pdfbutler.com/appexchange/index.html
- In PDF Butler Sales Cloud Demo, click Go.

- Log in to Salesforce and ensure you are in the Sales App.
2. Prepare the Opportunity #
- Navigate to the Opportunities tab.
- Open any existing record.
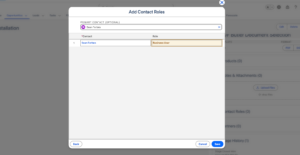
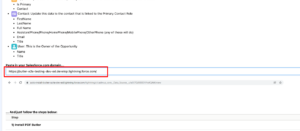
- Add a Contact Role:
- Assign a contact
- Mark as Primary Contact
- Select a Role
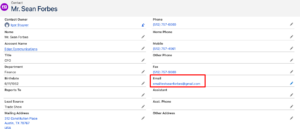
- Open the related Contact record.
- Update the email address (for testing purposes).
3. Install PDF Butler #
- Copy your Salesforce domain URL.

- Paste it into the Sales Demo page.
- In Install PDF Butler, click Go.

- Select Install for Admins Only.
- Grant access to all third-party websites.

4. Run Demo Setup #
- Click Go in Setup Sales Cloud Demo.
- Click Auto Register.
- Copy and securely save the generated credentials.
- Click Setup Sales Cloud Demo to continue.
- (Optional) In step 3, upload a logo for the Opportunity Account.
5. Add PDF Butler to the Page Layout #
- Open an Opportunity record.
- Click Setup (gear icon) → Edit Page.
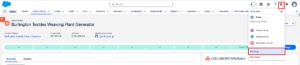
- From the components list, select PDF Butler Previewer.
- Drag and drop it onto the page layout.
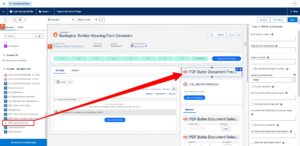
- In a new tab, open a Doc Config record.
- Copy the Doc Config ID.
- Paste it into the DocConfig to Retrieve field in the component.
- Click Save and then Activate the page.
6. Validate the Demo #
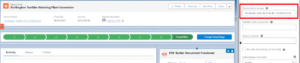
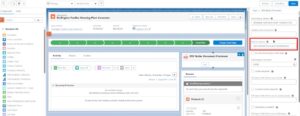
- Return to the Opportunity record.
- Confirm that the PDF Butler component is visible.
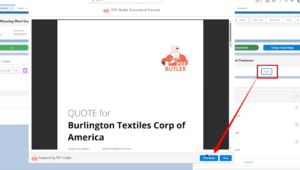
- Click the PDF button.
- Verify that the document is generated successfully.
Sign Butler – Sales Cloud Demo #
1. Access the Demo #
- Go to: https://assets.pdfbutler.com/appexchange/index.html
- In Sign Butler Sales Cloud Demo, click Go.
- Copy and paste your Salesforce domain URL.

2. Install and Enable Features #
- In Step 1, click Go to enable folders and enhanced sharing.
- In Step 2, click Go to install Sign Butler.
- Select Install for Admins Only.
- Grant access to all third-party websites.
3. Connect PDF Butler Credentials #
- In Step 3, enter your PDF Butler credentials.
- Click Check Credentials.
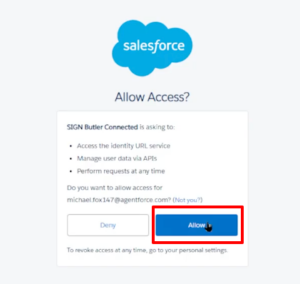
- Approve access to Sign Butler.
4. Import Configuration Files #
- In Step 4, download the configuration file.

- Go to the Sign Butler Admin tab → Migration.

- Click Import and upload the file.
- In Step 5, download the second configuration file.

- Go to PDF Butler Admin → Pack Migration.
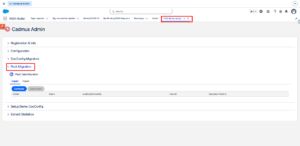
- Click Import and upload the file.
5. Configure Object Relationship #
- In Step 6, click Go to open Object Manager.
- Locate the Sign Request object.
- Go to Fields and Relationships.
- Click New.
- Select Lookup Relationship.
- Relate it to Opportunity.
- Save the Record.
6. Configure the Page Layout #
- Open an Opportunity record.
- Click Setup (gear icon) → Edit Page.
- Select the PDF Butler component.
- In a new tab, open the PDF Butler App.
- Locate the Sign Butler Pack.
- Copy the Pack ID.
- Paste it into the Pack to Retrieve field.
- Click Save.
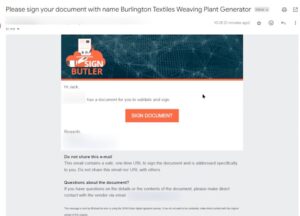
7. Validate Signing Process #
- Click the PDF button.
- Select Sign Butler.
- The primary contact on the Opportunity should receive an email to sign the document.