PDF Butler – TEXT WATERMARK Config Type #
The TEXT WATERMARK Config Type allows you to dynamically populate a Word document watermark using Salesforce data.
Change the text from a text watermark in the document. #
1. Configure the Watermark in Microsoft Word #
Before configuring PDF Butler, the watermark must first be added to the Word template.
Create a Custom Watermark #
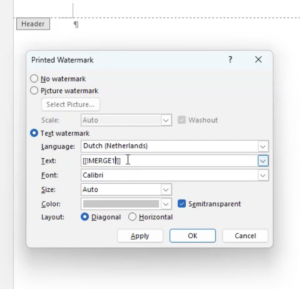
- Open the Word document.
- Search for Watermark in Microsoft Word.
- Select Custom Watermark.
- Choose Text Watermark.
- In the Text field, enter the merge field placeholder.
Example:
[[!Watermark_Text!]]
- Save the document.
2. Edit the Watermark Text (Optional) #
If you need to update or modify the watermark later:
- Double-click the document header area.
- Right-click the watermark.
- Edit the watermark properties as needed.
3. Configure PDF Butler #
Create the Doc Config #
- In Salesforce, create a Word Doc Config.
- Upload the Word template in the Doc Config Documents section.
Add the Data Source #
- Open the PDF Butler Editor.
- Add the required Data Source.
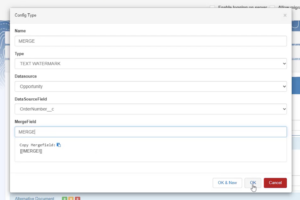
4. Configure the TEXT WATERMARK Config Type #
- Click Add Config Type.
- Configure the following values:
| Field | Value |
|---|---|
| Type | TEXT WATERMARK |
| Data Source Field | The Salesforce field to display as watermark |
| Merge Field | The merge field used in the Word watermark |
Example:
- Salesforce Field =
Opportunity.StageName - Merge Field =
Watermark_Text
5. Save and Generate the Document #
- Click Save to Server.
- Generate the document from Salesforce.
- Verify that the watermark displays the expected value.
Show or hide a text watermark by criteria. #
This configuration allows you to dynamically display a watermark only when specific conditions are met.
In this example:
- A watermark is only displayed when the Opportunity is marked as Private.
1. Prepare the Salesforce Record #
- Open the Opportunity record.
- Ensure the Private checkbox is selected.
2. Create the Word Doc Config #
- Create a new Word Doc Config.
- Upload the Word document template in the Doc Config Documents section.
3. Configure the Data Source #
- Open the PDF Butler Editor.
- Add the required Data Source.
4. Create a PARAGRAPH Config Type #
- Click Add Config Type.
- Configure the following values:
| Field | Value |
|---|---|
| Type | PARAGRAPH |
| Data Source | Select the appropriate Data Source |
| Merge Field | The merge field used in the template |
5. Configure Merge Field Removal #
- In the Remove MergeField Action section:
- Select MergeField Only
- Select MergeField Only
6. Add the Conditional Logic #
- Add a condition to the
PARAGRAPHConfig Type.
Example:
- If
Opportunity.Private = True
This condition controls when the watermark section should be applied.

Click Save.
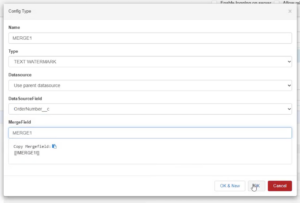
8. Add a Child Config Type #
- Under the
PARAGRAPHConfig Type, create a new Child Config Type.
9. Configure the TEXT WATERMARK #
- Set the child Config Type to:
| Field | Value |
|---|---|
| Type | TEXT WATERMARK |
- Configure:
- The Data Source Field
- The Watermark Merge Field
Example:
- Data Source Field =
Opportunity.StageName - Merge Field =
Watermark_Text
10. Save and Generate the Document #
- Click Save to Server.
- Generate the document from Salesforce.
- Verify that:
- The watermark only appears when the Opportunity is marked as Private
- The watermark displays the expected value
- Formatting is preserved correctly
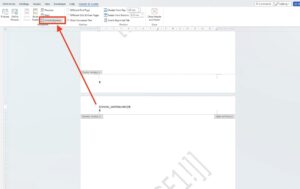
Have multiple sections in your MS Word with each having their text watermark. #
This configuration allows different sections of a Word document to contain independent watermarks.
By separating document sections and disabling header linking, each section can display its own dynamic watermark.
1. Prepare the Word Document #
Create Multiple Sections #
- Open the Word document.
- Create two or more sections in the document.
Insert a Section Break #
- Place the cursor where the new section should begin.
- Insert a Section Break.

2. Configure Independent Headers #
Each section must have its own independent header to support different watermarks.
- Double-click inside the header area of the new section.
- In the Header settings, disable:
- Link to Previous
This ensures the watermark in the new section is independent from the previous section.
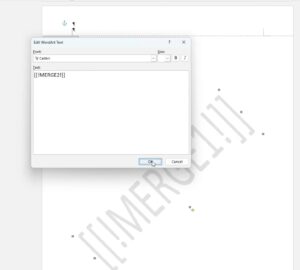
3. Configure the Watermark #
- Right-click the watermark text.
- Update the watermark name or merge field as needed.
Example:
[[!Watermark_Text2!]]
- Save the document.
4. Configure PDF Butler #
Create the Word Doc Config #
- Create a new Word Doc Config.
- Upload the Word document template in the Doc Config Documents section.
Add the Data Source #
- Open the PDF Butler Editor.
- Add the required Data Source.
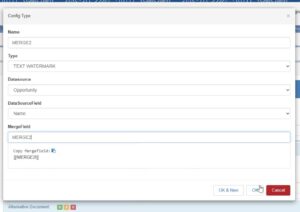
5. Configure the TEXT WATERMARK Config Type #
- Click Add Config Type.
- Configure the following values:
| Field | Value |
|---|---|
| Type | TEXT WATERMARK |
| Data Source Field | Salesforce field used for the watermark |
| Merge Field | Merge field configured in the Word watermark |
Example:
- Data Source Field =
Opportunity.Name - Merge Field =
Watermark_Text2
6. Save and Generate the Document #
- Click Save to Server.
- Generate the document from Salesforce.
- Verify that:
- Each section displays the expected watermark
- Watermarks are independent between sections
- Formatting and section breaks are preserved correctly


